Showing posts with label Material: Acrylic. Show all posts

Saturday, January 18, 2020

Sunflower Hat and Blanket

(Topic: Knitting, NICU donations)

Hi Friends!

This is a project I made at some point in the last three years, while I was in a knitting group that made blankets and hats for babies in the local NICU. I knitted quite a few, and I don't think I've posted this one before! This is one I had fun inventing, particularly the hat.

The hat  with petals! It has a crocheted border. This is before I added extra "leaves" to the green part.

The blanket is crocheted, but has a similar laciness to the hat.

Extra crocheted loops on the hat for "leaves". Some people still didn't recognize it as a flower, but it was intended to be reminiscent of Mary Cecil's flower fairies or Ann Geddes' photos, and I think of it as a sunflower.

The hat tied to the blanket with a ribbon so they don't get separated in the donation process.
 Donated blankets and hats are often basic so they're quick to knit, and I appreciate that, but I really get bored with that after a while. This one was fun because I mixed it up and invented as I went!


Yours,

Sarah

To subscribe, find the "subscribe by email" note in the left column and enter your email there. Links to posts will be emailed directly to you whenever I post them! Nothing else gets emailed.

Resource list: Visit my spreadsheet at www.tinyurl.com/infantloss

Monday, March 25, 2019

An Angel Baby Blanket

(Topic: Stillbirth, knitting, donation)

Hi Friends!

Well, anxiety makes it hard to sleep and lack of sleep sometimes gives me migraines - not a great combo for sitting down and writing.

That said, I actually have a completed project to show you this week!

In the past I have donate blankets to the NICU, but then I found out there's a way to donate blankets to a cause closer to my heart (not that the NICU isn't a great place to donate to! Simply because of my own experience, the following cause is one I'm closer to).
I found out that my local infant loss support group, which is run out of a hospital, also supports families who are in the hospital and experience a loss.
One of the things they sometimes do is provide blankets to wrap the babies in. For this particular group, the parameters are 15"x15" (in non-gendered colors, for the tiny babies), and 18"x18" for the larger babies.

So when one of my sisters was asking for a knitting project idea, something portable and relatively quick, this seemed like the perfect thing to suggest! I provided yarn (white, acrylic) and needles and basic directions, and let her have at it.

And she turned out a wonderful blanket! I think my mom helped guide her (this sister is a beginning knitter), but the bulk of the work was my sister's.

Apparently the amount of yarn I gave her (which was from my stash!) was not quite enough to make up the full measurements. So I got asked to add a border. Luckily I had a similar yarn, in variegated neutral baby colors, to add an edging!

I started with her live edge, picked up down the side, across the bottom, and up the other side. I then added a few rows to the top, added a picot bind off, bound off one side, added a few rows and a picot bind off to the bottom, then bound off the other side.

All this worked fine, but I was having some rolling issues, so I decided to do some stitching to even things out.


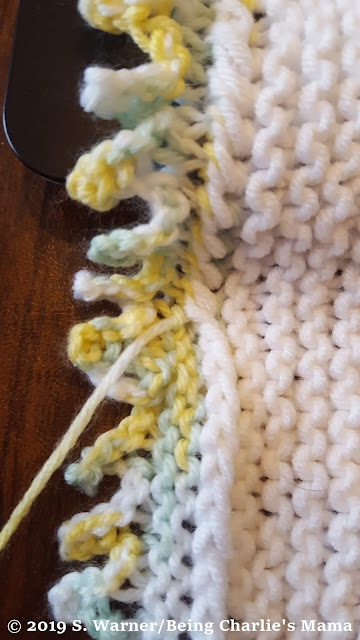
Stitching the edging to the row that I picked up from. You can see the difference it makes in reducing the curl.

Here I'm stitching one of my added rows to one of the blanket rows, in effect doing an after-the-fact welt. Again, it makes a huge difference in having the edging lie flat.

From the back, you can see how I'm taking the row that was displaced by me picking up stitches, and stitching it to the edging two rows up.

The beautiful finished project! The slight widening on the ends is due to the picot edging placing a lot of stitches in a narrow space.

Credit goes mostly to my sister who created this lovely blanket, which I certain will be loved by the family it goes to! They will cherish it if they decide to keep it, and the baby will be forever snuggled if they decide to have it stay with baby.


Yours,

Sarah

To subscribe, find the "subscribe by email" note in the left column and enter your email there. Links to posts will be emailed directly to you whenever I post them! Nothing else gets emailed.

Resource list: Visit my spreadsheet at www.tinyurl.com/infantloss

Saturday, February 9, 2019

Blue and Purple: The last baby blanket

(Topic: Knitting, NICU)

Hi Friends!

As you might recall, I've been working on baby blankets to be donated to the local NICU. In fact, you've seen the in-progress version of this very blanket before! Here are the last few steps, showing how I completed it.
Also, I found out that the local infant loss support group (that I actually go to!) was getting blankets from the same knitting group, for deceased infants. Obviously with my particular background, infant loss blankets speak to me a lot more than NICU blankets, since I never actually had a child in the NICU. There are many lovely people who will continue to make NICU blankets, but I, personally, have chosen to switch to infant loss blankets only, whenever I am in the mood to do baby blankets.

I tried a lime green, but really didn't like how it looked. When I started that color, I couldn't find another color, but later when I sorted my yarn, I found the (slightly) darker purple skein you see above! I liked it much better than the lime, so I frogged the green and did a darker lavender instead.

Beginning the dark lavender.
As plasticky as this chenille is, it actually makes quite a cozy blanket!

And, done! Two shades of lavender, and a slightly different chenille used for the blue edging (thus the skewed edges - there are the same number of stitches but the light blue yarn is thinner so it doesn't make as thick or wide a fabric).

Thank you to the Loose Knit Group for donating the baby blankets that I have made to this point.


Yours,

Sarah

To subscribe, find the "subscribe by email" note in the left column and enter your email there. Links to posts will be emailed directly to you whenever I post them! Nothing else gets emailed.

Resource list: Visit my spreadsheet at www.tinyurl.com/infantloss

Saturday, February 2, 2019

Keeping Pookie Warm

(Topic: Knitting, Weighted bear clothing)

Hi Friends!

A few weeks ago we had a cold snap and a lot of snow. On the spur of the moment, I decided Pookie needed some cold weather accessories! He didn't have a scarf yet, and though he did have mittens and hats already, I figured a matching set would be fun!

I started by rummaging in my yarn stash to see if I had something that grabbed my eye. You may recognize this yarn: I used it before on a color-pooled crocheted scarf! For this project, though, I'm just using it as a variegated yarn without worrying about trying to pool the colors into a pattern.

I started by casting on to what looked like a good width, and created a 2x2 rib for about an inch and a half as a border. I then just knitted every row (which creates a garter stitch), until the scarf looked like it was the right length!


The result! I'm quite happy with this. It wraps well but is just long enough that if I want to put a knot in, I can.

Well! One piece down, mittens and hat to go! I decided to work the mittens next, fitting them as I went. Because Pookie's paws are pretty small, even using magic loop didn't feel like a great idea, so I worked the mittens flat. I then drew the top together, and seamed the side.

Cuff is on the left. See on the right, where the top of the mitten is, that I have a light blue bit of yarn drawn through the last row of stitches? That's what I pulled to cinch the top of the mitten.

Cinched and seamed! This is the inside of the mitten.

It looks like a muffin!!! If I ever need to knit toy muffins, I'll do it like this! Well, maybe not, since it wouldn't have a bottom.

I added a string, because I really don't want to loose them by accident (I've lost Pookie's rain hat already, which I consider to be a tragedy of the highest magnitude. I'm not going to loose a hand-knit mitten because I didn't take the time to tie it on!). The string is 6 strands of yarn, braided.

Snug in his snowsuit, and modeling the new scarf and mittens!!

Still chilly. Pookie borrowed my couch snuggle blanket.
 Well, if Pookie is still cold, I'd better throw together a hat! I decided to do this in the round, using the magic loop technique so I would have flexibility to try it on him easily, and also so I wouldn't have to change techniques as I decrease toward the top.

I started with a 2x2 rib again, so that it would match the edging on the other pieces. Since I was shaping as I went, rather than following a prewritten pattern, I decreased when I got high enough for it to get over his ears. With the rib pulling it tight below, and since I didn't change needle size to a larger one or decrease the stitch count, the brim pulls inward and then it bulges out - and the goes pretty flat on top to match his head shape. This means that it looks a bit funny when it's not on him, but looks great on his head!

I also decided to add a pompom, just for fun! The annoying thing about doing a garter in the round is the same as doing stockinette flat: you have to alternate purl rows with knit rows, so you have to be sure to know where your round starts and ends.

"Yes? Oh - yep, I love the hat!"

Modelling the hat. If you look closely, you can see the braided tie, tied under his chin, to help prevent accidental hat loss!

We found out that, due to the interesting shaping, that it works as a tam too!

I'm really glad I added the mitten string, because he has no wrists to help keep the mittens on! They have a tendency to slide off, but they stay on pretty well if the cuff of the sweater or snowsuit is over the mitten.

Yours,

Sarah

To subscribe, find the "subscribe by email" note in the left column and enter your email there. Links to posts will be emailed directly to you whenever I post them! Nothing else gets emailed.

Resource list: Visit my spreadsheet at www.tinyurl.com/infantloss

Saturday, January 12, 2019

My new hat

(Topic: Knitting)

Hi Friends!

Today I got to take part in a really cool local yarn shop's knitting workshop. I rarely make things for myself, so making a hat FOR ME, and also IN ONE DAY, and WITH FRIENDS was a super cool opportunity!

Here are some in-progress pics, and, at the bottom, me wearing the finished product.

The top, made first. It's a wonky shape, but it comes out awesome.

Starting to be more hat shaped. I'm in LOOOOOVE with this color! It's a high-quality 100% acrylic yarn.

Done except tassel!

Yeah, love this yarn shop. 💗

Handmade tassel.

Done!!! So pretty!!!

I batted at the tassel for a full minute. I finished it about 2 hours ago and haven't taken it off yet. Super comfy!

Quick post, because I was at the yarn shop all day!!! I think I actually knitted for 10-1/2 hours today, making the hat from start to finish. It is a simple project but I think it is really cute, and I'm thrilled with the result!


Yours,

Sarah

To subscribe, find the "subscribe by email" note in the left column and enter your email there. Links to posts will be emailed directly to you whenever I post them! Nothing else gets emailed.

Resource list: Visit my spreadsheet at www.tinyurl.com/infantloss

Saturday, July 7, 2018

Lacy Baby Sweater

(Topic: Knitting, rainbow babies)


Dear Friends,

As you have seen, I recently finished a whole run of baby shrugs, for all the friends who had/will have babies. I enjoyed making those a lot! But now that they are done, I'm looking back into my own knitting pile, and the project I decided to work on next is another baby sweater... but this time, fancy and lacy (and thus it took much longer). This one is intended for our next child, whenever he or she comes along! Many of the baby clothes that I occasionally buy do have rainbows on them, to represent a child after loss, but I also like having non-gendered clothing, so while lacy is sometimes considered feminine, I'm not knitting it in particularly "girly" colors, so that this sweater can be worn by a boy or a girl.

Much of the process involves doing this scallop, sometimes in different colors, and the number of repeats depends on the width of piece (back vs. front vs. sleeve). But once you have the scallop down, the pattern is pretty straight-forward.


Two finished sleeves and the back (with simple shaping on the side for sleeves).


Two fronts, complete. Shaping on the outside edge for the sleeves, and then higher up there is shaping on the inside edge for the neckline.

Seamed together.

And, finished! With a simple border on the front and neckline.


Close up of the border.

I really love how it came out! The pattern is called a cashmere, but I didn't use cashmere yarn - I think I used an alpaca blend, but I've misplaced the labels, so I'm not sure! Oh well... It's fuzzy and pretty, so I'm happy!!!


Yours,

Sarah

To subscribe, find the "subscribe by email" note in the left column and enter your email there. Posts will be emailed directly to you whenever I post them!

Resource list: Visit my spreadsheet at www.tinyurl.com/infantloss

Sunday, June 10, 2018

The Last of the Baby Sweaters

(topic: babies, knitting)

Dear Friends,

As you know, my friends have been having a rash of babies lately, and I've been knitting lots of baby gifts! This post is about the last 2 shrugs I've make for this batch of babies. This last set is going to a rainbow baby - a new baby in a family that has previously lost a baby. I initially started with a nice wool, since I know the mom knits and will appreciate it and know how to care for it. I ended up with this one, which I am pleased with, which will probably fit a 3-4 month old:


Now, it turns out that this little one is a preemie, so she's very very little, and likely won't fit into that teal and fawn sweater anytime soon. So I decided to make a little care package with a few other things too, and then make a second sweater, that the baby will hopefully be able to wear sooner! This one is all acrylic for easy washing, and is scaled down in size simply by using a baby-weight yarn and needles two sizes smaller, rather than adjusting stitch counts.


I think it came out well, and hope that the receiving family likes both!

Yours,

Sarah

To subscribe, find the "subscribe by email" note in the left column and enter your email there. Posts will be emailed directly to you whenever I post them!

Resource list: Visit my spreadsheet at www.tinyurl.com/infantloss

Saturday, April 28, 2018

Baby Shrug

(topic: knitting)

Hi Friends!

I had to wait to post pictures of this, because I've given a few of these to friends and didn't want to spoil the surprise!

Lately, it seems like many of my friends have had (or are about to have) babies, and I wanted to come up with a gift that would be pretty straightforward and not take ages to make, but would be homemade and nice, and also pretty - and, bonus, I wanted it to be gender neutral (or at least, not terribly gender specific).

I poked around on Ravelry and did end up finding a free pattern that I liked! It is this Baby Shrug by Debbie Bliss. You knit the back, arms, and fronts in one piece. You then pick up around the front to add an edging, then pick up the bottom back and also the sleeve ends to do the same. Then you seam up each side/sleeve, and weave in the ends - and you're done! I haven't timed it, but it doesn't take too long to make, so this pattern is good even if you only have a few days notice that you'll be needing a gift! I didn't worry about swatching/gauge, because they'll fit into it when they fit... I used a standard worsted yarn, and the recommended 5mm (size 8) needles. I didn't change needle sizes at all, and the pattern didn't suffer. I suspect if I took a finer yarn and a smaller needle, I could have a smaller result easily - my guess is that my final product is for about a 3-month old.


The pink one at the top of the page is acrylic and washable, and the variegated ones below (made with the same yarn as the Color Pooled Scarf) are acrylic with some wool (but still washable).

The back, with an initial taper, worked in stockinette (smooth one side, bumpy on the other). This is before I started the sleeves.

Main piece done! The sleeves taper wider, then you start the neck shaping by working each side separately, then taper the sleeves down and then the front, each side separately. Then you pick up the the stitches around the front and neck, to make the ribbed edging. You do the bottom of the back, and the sleeve cuffs, each separately. Then seam up the sleeves.

Finished, from the front!

Finished, from the back!


Yours,

Sarah

To subscribe, find the "subscribe by email" note in the left column and enter your email there. Posts will be emailed directly to you whenever I post them!

Resource list: Visit my spreadsheet at www.tinyurl.com/infantloss

Saturday, March 10, 2018

Prayer Shawl 1, and a Sunflower


Dear Friends,

One of the knitting groups I'm in, which meets at a church, makes prayer shawls/lap blankets for the VA hospital in a nearby city. I've been in that group for close to 2 years, but somehow that project somehow rarely seemed to be on the top of my pile. Well! Yesterday I finally finished it!

It is made from yarns donated to the group, but there is enough yarn on hand I was able to select the colors I wanted to work with. You can probably tell that getting enough of the same gray was difficult, but working with several different balls of yarn, and even double-stranding at one point to make it knit to the right scale and tension, I was able to create the striping pattern I had in mind.

Also, one of my sisters helped me for a bit! She did several rows in the middle boring gray part.

The loose portion on the lower right is because I discovered we'd made a hole by accidentally picking up a stitch. That is easily fixable by just dropping the same stitch, but because I found it many rows too late, dropping the stitch made a long ladder of looseness down to where the hole was. I evened it out quite a bit, but some of it will need some time to settle down and even out.


Close-up of the loose section and the inadvertent gray-shade color changes. Not perfect, but warm and cuddly.

The sunflower on top of the shawl is a crocheted wall decoration, made by request for a friend. It's all cotton yarn.

Yours,

Sarah

To subscribe, find the "subscribe by email" note in the left column and enter your email there. Posts will be emailed directly to you whenever I post them!

Resource list: Visit my spreadsheet at www.tinyurl.com/infantloss