Showing posts with label Material: Cotton. Show all posts

Saturday, January 11, 2020

White and Blue Handtowel

(Topic: Knitting)

Hi Friends!

This is a project I finished a while ago, but am finally getting around to sharing. This is the partner to the Blue and White Handtowel I told you about last May.

It's the exact same pattern, with my exact same yarns and color choices: just reversed! This is so I have a matching but alternating pair of towels for the kitchen.

This was a really soft, silky cotton to work with, and ends up drying hands really well.

Most of the blue portion. The edges are garter and the center is seed stitch.

Here the decreases in the blue section are done, and I've started the white. The decreases continue until you get to the hanging bit.

And here they are, done! The matching pair, including reversed color buttons!

This is the pair in my new kitchen! I didn't sew the button until a few months ago - this picture is actually before the previous picture but I liked it better so I wanted to end with it!

 This was a lovely quick pattern to knit, and the cotton I used works really well. I'm sure it would work with any cotton yarn but the cheaper yarns that are easy to find would be a bit harsher and not as silky. I had fun with this project!

Yours,

Sarah

To subscribe, find the "subscribe by email" note in the left column and enter your email there. Links to posts will be emailed directly to you whenever I post them! Nothing else gets emailed.

Resource list: Visit my spreadsheet at www.tinyurl.com/infantloss

Saturday, December 21, 2019

Pan Handle Potholder

(Topic: Crochet, sewing, cooking)

Hi Friends!

Recently we noticed that our cast iron pans with bare handles (as opposed to wooden handles) are easier to pick up when we have a dedicated potholder shaped like the handle rather than just wrapping one around it.

I figured, that would be something easy to make! So I crocheted one, using cotton yarn:

Crocheted exactly to the specs of our pan handles!

Added a loop so I can hang it up with our other potholders on the kitchen wall!

I also lined it with a double layer of cotton flannel for extra heat protection, stitched along the bottom edge to prevent slippage. It works really well!!


Yours,

Sarah

To subscribe, find the "subscribe by email" note in the left column and enter your email there. Links to posts will be emailed directly to you whenever I post them! Nothing else gets emailed.

Resource list: Visit my spreadsheet at www.tinyurl.com/infantloss

Saturday, June 8, 2019

Paper Cutting Art

(Topic: Crafts, art)

Hi Friends!

Just a quick share today.

I made this piece of art a number of years ago (not actually sure exactly when) and had it in a folder for a while, tucked away. Then a few years later, I decided to put it up and frame it, and found the perfect piece of fabric to put behind it for the color (a sunset?).

Matted but not yet framed, in this picture. I have it in a dark frame to match the outer matting.

I've had it hanging in my kitchen for a while now, and will definitely be sad to take it down. I'm certainly planning on putting it up again in my new house - I'll just have to decide where!


Yours,

Sarah

To subscribe, find the "subscribe by email" note in the left column and enter your email there. Links to posts will be emailed directly to you whenever I post them! Nothing else gets emailed.

Resource list: Visit my spreadsheet at www.tinyurl.com/infantloss

Saturday, May 11, 2019

Blue and White Handtowel

(Topic: Knitting)

Hi Friends!

I have been knitting a bunch this week. This particular pattern was nice and easy - I actually specifically picked it out to be one where I mostly don't have to look at the pattern (unlike the green lacy cowl I am still plugging away at...), so it's easier to do in the car on road trips.

This pattern is called the "At Your Service Knit Cloth" by Yarnspirations, and the yarn I used was from Plymouth Yarn, called "Fantasy Naturale" and is 100% cotton.

Isn't the yarn pretty? I think the pattern really only would have needed one skein of this particular yarn, but I got 2 so I can do the color change. Since I'll have extra, though, I'm going to make another one with the colors reversed!

The bottom portion of the dishcloth, up till the color change.

Here's a close up of the decreases that taper the top of the towel. The edges of the towel are garter stitch, the center is seed stitch.

Done with the body of the towel, working on the hanging loop! The stitch marker is where the button will go.

Done with the top! The buttonhole only accommodates about a 3/4" button.

Folded over, like it will when hung up.

Ta Da! We've been using it this week, and I really like it so far!

Yours,

Sarah

To subscribe, find the "subscribe by email" note in the left column and enter your email there. Links to posts will be emailed directly to you whenever I post them! Nothing else gets emailed.

Resource list: Visit my spreadsheet at www.tinyurl.com/infantloss

Saturday, April 27, 2019

Toddler Dress - Done!!

(Topic: Knitting)

Hi Friends,

Remember that knitted baby/toddler dress I was working on? I finished it!!!!!

It came out really well. I'm really happy with it.

I seamed using a whip stitch. I would have liked the blue stripe to line up a bit better. I think a mattress stitch would have helped, but I'm not actually 100% sure that I got exactly the same row count (since it was done flat, rather than in the round, and the instructions were "until it measures x inches", so it's possible I didn't count out rows accurately on the second side.

And here's the finished product!!! I decided to make the "ribbon" by braiding the same yarn used for the blue stripe at the bottom. Super cute, right?


Yours,

Sarah

To subscribe, find the "subscribe by email" note in the left column and enter your email there. Links to posts will be emailed directly to you whenever I post them! Nothing else gets emailed.

Resource list: Visit my spreadsheet at www.tinyurl.com/infantloss

Saturday, April 6, 2019

I'm Nearly Done with the Toddler Dress!

(Topics: knitting)

Hi Friends!

Back in August, I posted about a dress I'd started making, but I only had about 3" done. Well, I'm nearly there!!

This is the beginning of the back piece, that I showed you last time. I decided to add the blue stripe.
The beginning of the front. Notice that I've figured out better tension. This was largely due to switching from (slippery) metal needles to (grippier) bamboo needles. Since the yarn was so slippery anyway, having slippery needles made keeping even tension very difficult. It's a lot easier with a bit more grip.

The lace holes for a ribbon to be threaded through, at the waistline.


Finished back! I'm actually pretty far on the front now too, so the next post about this dress will be a finished product! The ribbon will be blue to match the stripe, and it's sleeveless, so once I put the front and back together, it's just a matter of knitting the neckline.

Can't wait to see how it comes out!


Yours,

Sarah

To subscribe, find the "subscribe by email" note in the left column and enter your email there. Links to posts will be emailed directly to you whenever I post them! Nothing else gets emailed.

Resource list: Visit my spreadsheet at www.tinyurl.com/infantloss

Saturday, March 30, 2019

Angel Mama Shirt

(Topic: Bereaved mothers, sewing, alterations)

Hi Friends!

Last year I got a T-shirt from a large online personalization/printing company that sells hats, shirts, mugs, mousepads... anything you could print and personalize.

One of the designs they carry is a "Mother of an Angel" shirt! There are options out there, and this company's shirt was one of the designs I liked better.

When I got the shirt, though, I was very disappointed in the sleeves, because I felt like I couldn't lift my arms up, because they were sewn at a strange angle.

Well, I can sew, right? So I figured I'd try to fix them!
I found a piece of knit/jersey in a coordinating pink, and cut triangles, hemmed them, and inset them.


Note the corner pointing toward my elbow...
Because the original sleeve was so slanted down, that the triangle ends up making a bit of a corner, but that isn't too bad. The only thing I could have done was actually make the triangle less wide. As it is, the sleeve is actually a bit too floppy and the pink kind of folds up on itself. But I don't mind enough to change it! As it is, it took a shirt I was horribly frustrated with and didn't want to wear, and turned it into a shirt I really like!


Yours,

Sarah

To subscribe, find the "subscribe by email" note in the left column and enter your email there. Posts will be emailed directly to you whenever I post them!

Resource list: Visit my spreadsheet at www.tinyurl.com/infantloss

Saturday, March 16, 2019

Crocheted stripey scrap blanket

(Topic: Crocheting)

Hi Friends,

This is a project I've been doing for a long time (as in, many years).
It started with some scrap cotton yarn I had, starting with a red stripe. Then I unraveled the (not stretchy non-wearable) socks, and those blues and yellows came next. Then I added some whole balls of cotton yarn I had, and simply added by whim from there!

I consider the red stripe to be the bottom of the blanket. This will hopefully be for a twin or queen (I haven't checked dimensions yet).

The full stripe set so far! Next is a medium blue, then a light blue. Note that for much of the center, I put a narrow stripe of green between each color, but I'm going to change up whether or not I do it, depending on what colors I do.

Literally all of the blanket is single crochet - on purpose, so that this remains a simple and easy project to pick up when I need a break from knitting lacy things!

No idea when I'll actually finish it, but I assure you that you will see pictures when I do!

Yours,

Sarah

To subscribe, find the "subscribe by email" note in the left column and enter your email there. Links to posts will be emailed directly to you whenever I post them! Nothing else gets emailed.

Resource list: Visit my spreadsheet at www.tinyurl.com/infantloss

Monday, March 11, 2019

Mommy and Me Apron

(Topic: Sewing, Teddy bear clothes)

Hi Friends!

Well, I had a migraine on Saturday and was busy on Sunday, so here's the post I was supposed to finish on Saturday. Oops!

This is a project I really, really enjoyed. This is the first matching outfit Pookie and I have.


This is my apron. I did not make it: I got it from Grove.co and I like it. It's not perfect, but it's nice. I had to add some extra strap to the neck to make it long enough, for instance.

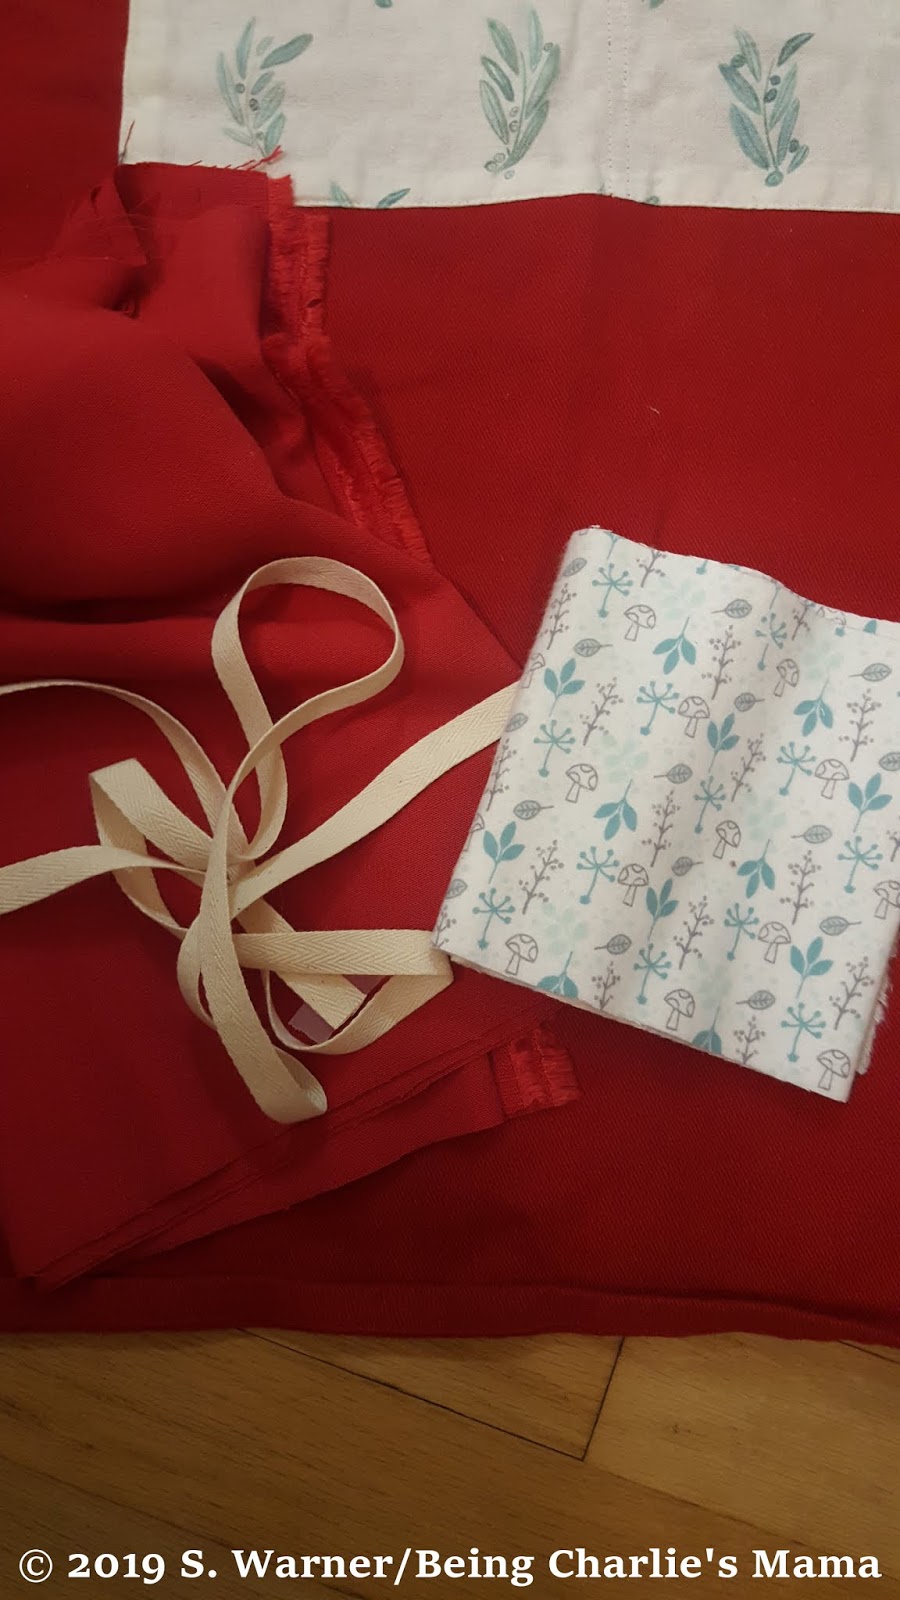
While I was at the fabric store finding cotton strap for MY apron, I found mini cotton strap!!! So I also found some red fabric that was similar enough to the canvas of my apron. The part that was tricky was finding a fabric that mimicked the pocket fabric on mine. After much hunting, I found this fabric in the flannels, which has as similar visual effect!

Laying it out after cutting out the basic shape.

Pinning the hems, and testing pocket size to get the right proportions.

All sewn, and I've added eyelets to mimic the grommets on mine.

All done! I hand stitched the straps.

Hanging with mine in the kitchen!

Pookie and Mommy handling dinner with panache!

He's helping dry the dishes afterward, too. What a helpful bear!


Yours,

Sarah

To subscribe, find the "subscribe by email" note in the left column and enter your email there. Links to posts will be emailed directly to you whenever I post them! Nothing else gets emailed.

Resource list: Visit my spreadsheet at www.tinyurl.com/infantloss

Saturday, January 19, 2019

Potholders

(topic: crochet)

Hi Friends!

This was a Christmas gift, so although I finished it about a month ago, I couldn't post till now!! I'm a potholder fan, and my hubby is an oven mitt guy, so I looked for a compromise. There are options out there, but I like making things myself. I have made a pair like this for us, and we liked it so much that when we realized my sister needed to equip her apartment kitchen a bit more, this seemed like the perfect thing! I picked 2 colors I know she likes, in a cotton yarn (non-flammable, much. Other options would be 100% wool. Both char more than burning or melting - non-natural fibers melt, which is dangerous if it gets on your skin). These are all single crochets: 2 squares, and just edged together using more single crochets!

The colors, and the cast on!
Finished products - front (I like reversing the colors in the second potholder. Fun!)

Finished products - back

They're fairly fast to make, and it's fun to pick out the color combinations! The single crochet, if done tightly, has no holes for fingers to get burned through, and is thick enough for normal work - but if grabbed from the outside (instead of used as a mitt) can be a double layer for super hot things!


Yours,

Sarah

To subscribe, find the "subscribe by email" note in the left column and enter your email there. Links to posts will be emailed directly to you whenever I post them! Nothing else gets emailed.

Resource list: Visit my spreadsheet at www.tinyurl.com/infantloss

Saturday, August 18, 2018

In Progress: Baby Dress

(Topic: Knitting)

Hi Friends!

Just a quick update today, about a "WIP" (Work In Progress). I'm currently knitting a baby/toddler dress. I'm not concerned with exact gauge, because I'll just use it whenever I end up with a child that fits in it!

I found the yarn at Joann's, but then it got discontinued by the store, so I only found the accent blue there... luckily, I can order directly from the manufacturer, and for about the same price! So I ordered several skeins of white, since that's what I want the dress to be. It's Fair Isle brand, Harbor style. Colorways are White and Vivid Blue. I really like the texture (silky!) but it's sometimes a bit slippery to work with.

Here's my so-far photo:


This photo is the bottom of the back of the dress. The back and the front are worked separately, and it's sleeveless. It's a Debbie Bliss pattern. I'm adding the striping myself; the original pattern calls for only one yarn color.

I think I'm on size 3 needles, and I always use circular needles: I find that circs have the weight of the work between your hands, whereas straights have the weight of the work pulling down on the outside ends of the needles on either side of your hands. I prefer circs for most things, personal preference!

Eventually there will be eyelets around the waist, too, and I've been asked whether the ribbon will be blue. I'll have to see: depends on where else I add blue, whether it will be a good accent or too much.

More updates on this later as I get more of it done!


Yours,

Sarah

To subscribe, find the "subscribe by email" note in the left column and enter your email there. Posts will be emailed directly to you whenever I post them!

Resource list: Visit my spreadsheet at www.tinyurl.com/infantloss

Saturday, July 14, 2018

Christmas Tree Skirt

(Topic: Sewing, holidays)


Hi Friends!

This post is later than I'd hoped... not only is this about a Christmas item that took me till early June to finish, I also had to wait to post until I gave the present to its new owner! I started this in December of 2017, for a friend who noticed that her current tree skirt was actually too small in diameter compared to the size of their tree. Since their tree is an artificial tree rather than fresh, this is an ongoing problem rather than a transient one! Well, knowing my friend and that she likes to knit but NOT sew, I figured I could fix the problem!

First I had to figure out the math (and sneakily get some measurements of their current tree skirt from her hubby!). Here are some of my diagrams and figuring:


Once I knew the circle size and how I wanted to divide it, I made a wedge pattern and added seam allowances (though I probably shouldn't have... more on that later).


I then made notes, so I can re-use the pattern without having to re-figure everything:


And in theory, those measurements listed on the pattern piece should make it fit my friend's tree really well this year! Cross your fingers...

Then I started picking out Christmas fabrics. I actually didn't purchase any: I had some from another friend who has previously made a tree skirt, and some I already had it my fabric stash. I cut out 16 shapes, to make two 8-panel circles: by putting some on top and some on the bottom, I could get a nice finished effect, and have the tree skirt be reversible.

Figuring out which ones should be next to each other!

Nearly there... I seem to have a front and back picked out, and mostly in order.

After I figured out what was going where, it was a matter of making the batting layer, quilting (sort of), and then attaching the pieces together; finishing edges and how to connect the pieces was an aspect I hadn't thought out yet at this point.

I used a slightly heavier fabric that I think is mostly wool as the batting.

Here you can see the batting poking out... I didn't think about the fact that, no matter which way I cut the pieces, at least one or both of the long edges was probably going to be on the bias (diagonal) of the fabric, and thus prone to stretching.

Slowly getting each piece sewn together: top, batting, and bottom, sewn around the edges and down the center. That center seam is the only "quilt" aspect, but will keep the batting/wool layer from shifting too much, especially if this eventually gets washed.

Whew! Each top/middle/bottom is now one piece. I'm keeping them in the same order on the floor and only working on one at a time, to keep the order the same and not lose my place.
At this point I had to figure out how to finish and connect the pieces. Remember I have about a half inch on every side as seam/hem allowance, but I'm not doing hems! My pieces actually ended up slightly too large because of this. Because of the bulk of the layers, though, I didn't really want to try to hem. So I tried a binding, which at first didn't work because I used too narrow of a bias strip! But then I bought a 3-fold 3/4" bias edging, which worked really well. And instead of hemming and then somehow connecting the pieces, I bias-edged, then laid one piece's edge over the other, and sewed down the bias strip from the outside to the center of the circle. Because of the long edges being sometimes on the bias of the fabric too, this meant that some edges didn't align perfectly, but I trimmed them before I put edging on the center hole and outside edge. Done!

Done, viewed from the red/green side. Notice slight buckling on the far side, center hole: minor enough it will not affect use, but is likely an artifact of the long sides being bias cut, so there was some stretching and warping I didn't account for.

Finished version, more "winter" themed side.

Close up of the closure. This is snap tape, so all I had to do was sew the tape on, rather than each snap individually. It's nearly invisible once closed, though it will work fine as a tree skirt if left unsnapped or if only a few are closed.
I'm really happy with how it came out!!! It took me 6 months to do all the pieces, though admittedly I was not working on it every day. Not sure I'll do another anytime soon, but this was fun!

Yours,

Sarah

To subscribe, find the "subscribe by email" note in the left column and enter your email there. Posts will be emailed directly to you whenever I post them!

Resource list: Visit my spreadsheet at www.tinyurl.com/infantloss