Sunday, December 18, 2016

Rose Baby Blanket

Hi Friends!

Did I warn you I'd be knitting like a fiend, or did I warn you?? :)
This blanket has been most of what I've been working on for the last 10 days or so... and I loved it!

Garment Data:
- Type: Baby blanket for a crib
- Date made: December 2016
- Pattern: My own, invented as I went. 25"x36", or so.
- Fabric/Materials: 100% acrylic yarn. Fairly soft.
- Trim: More of the same yarn
- Time to finish: About a week and a half

First I crocheted a rose. This was by request, since it's for a baby girl. I then used white to make it square, and then picket up stitches along one side, increased, and started knitting. This became the top edge of the blanket.

Here you can see the finished top edge. To complete it and even out the sizing and shaping, I crocheted around the whole thing once, and then picked up stitches to create the side that would become the rest of the blanket. I went for plain knit, but added purled stripes accenting the stripe of color, and then went back to plain knit. I'm using a size 10 (6mm) round knitting needle. I prefer knitting on round needles even for flat items, because the needles are smaller and you don't get as much bunching of the project.

Mostly done. I added a 3-wide, 4-long square checker pattern toward the bottom. This visually balances the sideways top edge of the blanket. Then I added a pink border, including scallops. This picture is in progress on the scallops, as I worked with crochet to adjust sizing and shaping again.

Finished, but I still have some stray yarn tails, and it's got some weird rippling going on that will disappear once I block it.

The completed blanket, pinned out for blocking (after washing the blanket, you pin it down in the right shape and dimensions while it's still damp. Then it dries in the right shape). The crocheted scalloped border is complete.

I'll be posting projects I complete to sell, as well as those I make for myself and my friends, so watch my Etsy page if there's something you like!

Most sincerely yours,
~ Sarah

Thursday, December 15, 2016

Tiger Christmas Stocking

Dear Friends...

Yes, another knitted project! This is a Christmas stocking in the favorite colors for a special little boy I know.

Garment Project Data:
- Type: Christmas stocking, meant to be hung
- Date made: December 14th and 15th 2016
- Pattern: Made it up as I went
- Fabric/Materials: Cotton yarn in orange and brown
- Trim: black wool yarn
- Time to finish: 2 days

The first decision was the yarns. The idea was to do tiger stripes, but to use yarns I already had in my stash. I came up with a cotton orange, a cotton brown, and a wool black. I was wary of using the orange with black because of the different materials and thicknesses, and I was worried it would be a very stark look. But just orange and brown seemed a little pale. With the help of some friends, I settled on the brown for the stripes and black for trim.

Here goes! I'm free handing the pattern, so I really didn't plan or gauge. It actually ended up being a little larger around than I'd pictured, but it'll work. You'll notice that despite not working in the round, I'm on round needles again. Here I'm using a size 3, since I wanted a really tight look.

And the heel is turned! I actually goofed a little and one side slants a bit more sharply (a few more rows) than the other side, but I can fix that when I seam up the back. You can see I'm tapering the stripes by doing uneven amounts in each row.

The finished knitted portion.

And done seaming up the back! Since this is going to be a Christmas stocking and not worn, I seamed up the bottom/back (which would be uncomfortable when worn) and didn't worry about actually making the heel a full 90-degree turn. Also, the foot portion is proportionally short, which makes it easy to get things out of the bottom.

And complete! A crocheted scalloped border at the top, and a crocheted loop to hang it from. Weave in the ends, and voilá!

Most sincerely yours,
~ Sarah

Wednesday, December 7, 2016

Baby Set


Dearest Readers,

I made this earlier this year. After I finished it, I put down knitting, and even other crafts and sewing, for a long time. I didn't realize that I hadn't posted pictures! I am now experiencing a knitting renaissance, and will likely be posting many more knitted items :)

Garment Data:
- Type: Sweater and bonnet set
- Date made: Early 2016
- Pattern: See picture below of the book
- Fabric/Materials: Wool yarn, bought at a local yarn store
- Trim: none
- Time to finish: A few weeks, if I recall


This is my all-time favorite pattern book. I bought it as a complete splurge once, and have used it successfully for many, many different events.
My supplies. Wool, and 4 sets of needles: Size 3s and size 5s, in rounds and in DPNs (double pointed needles). I like using round needles even when doing flat work, because my work can't "fall off" of the other end of the needle. Also, the stiff portion can be shorter than a single pointed needle, so I feel like it's not unbalanced and "end-heavy" like I feel with long needles. The DPNs are super useful when doing something very small and circular, where you can't get a good angle with only 2 needles.

The finished jacket/sweater. The pattern only calls for a single color, but I wanted the contrast, so I just used dark blue and white for the first and last few rows. I love how it came out!

Finished bonnet. I simply twisted yarn multiple times to create the strings.

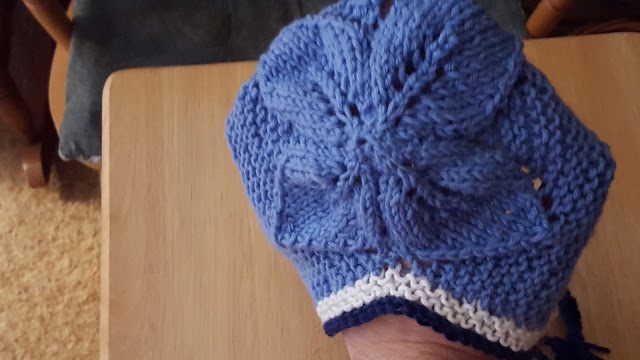
The leafy back of the bonnet. SO CUTE! Can't wait to see this on a little one!

Most sincerely yours,
~ Sarah

Sunday, December 4, 2016

Leafy Baby Hat


Dear Friends,

I recently had the opportunity to give to a family in need, and one of the things they needed were clothes for a newborn, who they are currently expecting. I can't give baby clothes without at least something handmade! So I pulled out my go-to pattern book for super-cute baby knits, and here we go.

Garment Data:
- Type: Infant hat
- Date made: November 2016
- Pattern: See picture below of the book
- Fabric/Materials: Acrylic yarn, worsted weight
- Trim: none
- Time to finish: 2 days

My favorite pattern book. Clear, easy to follow, and beautiful.

In progress. It works up really fast! It is knitted "flat" from the top, and then seamed to finish.
The finished hat, prior to adding the seam.

Finished! I actually forgot to switch to the larger needles after the leaves were done, so it's a bit straighter and narrower then intended. Oh well!

Most sincerely yours,
~ Sarah

Wednesday, November 30, 2016

Greenleaf Dry Goods

Hello Ladies and Gents!

We have a new endeavor on our hands...
I have opened a shop on Etsy, a website that allows me to sell handcrafted goods to people all over the country. I don't have a lot up yet, but I'll be adding to it... It will be mostly embroidered or sewn items, including, hopefully, some accessories for civil war reenactors. Please take a look by clicking on the Etsy logo below my signature. I look forward to seeing you there!

Most sincerely yours,
~ Sarah

Wednesday, October 12, 2016

Forget-Me-Not

Hi Esteemed Friends!

As you may have noticed, I promised the other half of the t-shirt project, and I'm still not done with it... That's because I have a minor hand tendonitis flaring up that I don't want to aggravate, so I used the chance to have my sewing machines serviced. So, several projects have been put on a temporary pause.

However, I discovered that I can still hold an embroidery hoop with the affected hand! So here's the current project.


Garment Project Data:
- Type: Ribbon Embroidered Bookmark
- Date made: October 2016
- Pattern: By Angela Dower, from "A-Z of Ribbon Embroidery" from Search Press Classics.
- Fabric/Materials: Lace-edged bookmark in 18-count Aida (bought with the edging attached). 1/4" polyester ribbon. Cotton Embroidery floss.
- Trim: See above
- Time to finish: One afternoon


This book was on the "new book" shelf at the library, and when I was looking through it, this pattern jumped out at me. I have a friend for whom Forget-Me-Nots are meaningful, so I am doing it for that friend.

The book specified a 4mm-wide silk ribbon and silk embroidery floss. I found silk ribbon to be difficult to obtain, and also it's hard to find ribbon that width, so I'm doing the pattern in 6mm (1/4") ribbon, and it's poly because that was accessible locally. Additionally, I have all the DMC embroidery floss colors in cotton and am on somewhat of a budget right now, so the less I was buying new for this project, the better. I think it turned out ok!


The book itself!


And the back, for those of you who want the isbn :)

The specific instructions. I noticed it wasn't very specific about how to do it (just a basic stitch chart) and it wasn't the clearest instruction ever.

In progress! It's coming along nicely. My petals and leaves have a bit of a stiffer look because I used regular ribbons instead of a nice soft silk, but it still is coming out super pretty!
 
Final result. Apologies for the binder clip: I covered the initials I embroidered. Privacy! I'm very very pleased with how it turned out!
Most sincerely yours,
~ Sarah

Thursday, October 6, 2016

Half-Mourning Shirt


Hi!

Yep, I'm mixing eras! Oops! I found a t-shirt with meaning to me at Goodwill, and it happened to be in lavender and thus be perfect for half mourning. Hurrah! But wait, it doesn't fit...

However, upon consideration, I realized it would be perfect if I expanded it by adding panels to the side seams. I then found some silk in my stash that matched the color palette!

In the mourning traditions of the 19th century, people wore all black right after a loss, then transitioned to black with some white accents, and then to lavender and gray in the 3rd stage. Each type of loss had its own timeline, also based on how you were related to the deceased, but the color progression seems to have been culturally used in the Western world for much of the century.

Nowadays, the American culture does not have many symbols of mourning. People wear black to a funeral, but there is not much beyond that. So it can be very nice to adopt a little bit of it, even if not many people will know or understand. It can be a small symbol, like a hairtie or the color of your socks, or something larger, like hair ribbons, or a black edged pocket square, or even a black ribbon on the door. And since we are not constrained by "that's how it's done", we have the freedom to choose the symbols and timing. We can even go back and forth between colors/stages as befits our feeling at any given time

For me, the creation of the symbols is nearly as important as choosing to wear them. For me, this lavender shirt will be one of those symbols.

A few of you will have read my post on the full mourning dress I made and wore. I have to confess it was very nice to wear a tribute of that magnitude and also have everyone know what it meant, even if they didn't know details. Yes, I had to explain a few times that it was reflecting my modern reality, but everyone was very respectful. I'm a little sad we don't have something anymore that has the same automatic recognition. But being able to choose your own symbols has a different wonderful place.

This is part one because I have yet to assemble the pieces, but my sewing machine is getting serviced... I hope to show you the finished product soon.

Garment Data:
- Type: Shirt/Top
- Date made: September 2016
- Pattern: None
- Fabric/Materials: A T-shirt and 2 silk camisoles from Goodwill
- Trim: Silk accents from the camisoles
- Time to finish: Several days, off and on

The original t-shirt from Goodwill, polyester, size XS.

An interesting detail from the original shirt: an inset panel running down the length of the back, and a horizontal line of accent stitching. I decided to use the panel in my design as well.

Sorry, I hadn't ironed these yet when I took the picture. They are silk camisoles I found at Goodwill years ago, thinking that of course I would find a use for the silk! They are much to small for me to wear.

The first step is taking out the side seams.
Ironed and disassembled. They had nice french seams, almost made me feel bad taking them apart! Also, it took forever.


Most sincerely yours,
~ Sarah

Tuesday, September 27, 2016

Patch Banner

Dear Friends,

I was recently inspired by something my mother-in-law made for my husband as a child. Everywhere they traveled, they got patches or pins as a souvenir, and in order to create a way to store and display them, she made him a banner. I have copied her pattern for my own patches, pins, and mementos.

Garment Data:
- Type: Patch display banner
- Date made: September 2016
- Pattern: Anne's design
- Fabric/Materials: 3/4 yard felt, cut to a 23" width, dowel, ball-shaped dowel ends
- Trim: Ribbon, braided cord made out of embroidery floss
- Time to finish: 1 hour?

The completed banner. I have it folded in quarters and just basted onto the rod, so that as I fill it up from the bottom, I can lengthen it (this is also in the original design!).

The items on here are: several civil war style cockades and several trinkets that are used to identify that a reenactor has paid the entrance fee for an event. I have patches too, but haven't found which box they are currently in!

Detail of the ribbon I attached by hand stitching. I finished the ends with Fray-Check. And I cut the bottom of the banner into a point (like my husbands) but instead of adding a fringe like his, I cut a fringe of about 2" or 2-1/2" long.

Detail of the dowel, dowel end, braided cord, and basting stitches.

As I hinted on Facebook, I am also working on adapting a t-shirt. I hope to make that the next post but didn't finish it this week.

Thanks to Anne for her inspiration and  design for this banner!

Most sincerely yours,
~ Sarah

Thursday, September 15, 2016

Dark Hatbox

Hello lads and lasses!

The other night I decorated a hatbox, which I intend to use to store a mourning bonnet. Which I have not yet made, but that will come...
At any rate, I needed a second hatbox and decided to use a darker color scheme to match what I know I will be storing in it.

Garment Project Data:
- Type: Hatbox, purchased at a craft store. It is cardboard.
- Date made: September 2016
- Pattern: none. I just decorated a purchased box
- Fabric/Materials: Paper napkins, tissue paper, ModPodge
- Trim: ribbon (satin and sheer)
- Time to finish: several hours (most of a day?), including drying time.


The completed hat box with the lid perched on a pail to dry.

And the closed view.

Detail of the lid. This oak leaf is one I found outside, already skeletal and beautiful.

The lid has a base of 2 layers of white tissue paper, then the oak leaf. I then added Money Plant seed pods around the outside.

The side of the lid has 2 bands of ribbon, over the white tissue paper.

The box is done in black tissue paper that has rainbow colored sparkles. I then added a double layer of sheer white ribbon along the bottom edge, the same black satin ribbon as the lid but in a "drum" zig-zag pattern, and hearts with a white bird printed on them, which were cut from paper napkins.

Detail of the 2-layer sheer ribbon.
Detail of the heart. Unfortunately they were more sheer than I realized, so the printed white bird is all but invisible. Phooey. There are 8 hearts around the box.

The bottom of the box has a printed tissue paper, plus a blue-white rose cut from the same paper napkins as the hearts.

Most sincerely yours,
~ Sarah

Saturday, September 10, 2016

1860s Maternity Dress

Hello Friends,

Recently I decided to try to make a maternity-style dress, with the challenges of being able to accommodate different sizes and shapes that a body does during pregnancy. Since different people also carry differently (like high vs. low), the dress does end up being somewhat personalized (such as shoulder-to-waist length), but is much more flexible in sizing than the typical Civil War era dress, especially in the waist. This dress presented some interesting challenges. In the captions I will note some of the issues I encountered with the final product and possible solutions I could implement.

Garment Data:
- Type: Maternity dress, 1860s-style. Long sleeved, day wear.
- Date made: February 2016
- Pattern: self-drafted, based loosely on the pattern my friend Karen drafted for me, and on resources I read on thesewingacademy.org about how maternity dresses were made.
- Fabric/Materials: A heavy fabric I found at goodwill. Possibly meant for drapery and upholstery, this is actually slightly heavier than I'd normally use for a dress, but still light enough that I dared. Quite stiff.
- Trim: Cotton collar and cuffs.
- Time to finish: A few days?


Unfortunately I didn't get many in-progress pictures as I made it, but I have some detail shots and finished-product pictures, so I'll share those!

The fabric. The geometric pattern is good for Civil War era, but the swirly background is modern...

Sharpie for scale :)
Detail of the front bodice drawstrings. There is a set like this on either side of the front bodice. I created it by sewing a strip of muslin to the widened bodice front, and then sewed down the middle (I did not sew down the ends). I then threaded a bias tape through both tunnels so that the ends came out next to the front closure. Hope that makes sense!

The dress, part way done. Note the pins marking where I'll be putting buttons!
The waist is also bigger than usual, with an 8" overlap. I can change it to match the size needed, just by moving the hooks that close the waistband.

Seated, with hoops (no corset). While a gestational corset could certainly be used, I did not have one to work with. But since the bodice front is made to be more roomy anyway, the shifted and less structured body works beneath it.

Front view. It buttons down the front. Note that you can see the skirt overlap, and that it falls very un-gracefully. I could probably remedy this partially by making most of the skirt gauged instead of wide pleats, and then I could even have the front portion on drawstrings like the bodice so that it is easier to adjust.

Side view. You can see here that the skirt looks a little strained around the circumference of the hoops. I have extra fabric, so if I change from knife pleats to cartridge pleats (gauging), I will also add another panel. This will soften the way the skirt falls, I hope. I will also wash the dress at some point :) and see if the stiffness is partially some sort of sizing. If so, I think it will also hang more naturally after that.


Rear view. They back has not been altered from my normal pattern, so this is pretty standard. YES, I know the petticoat is showing!!! I didn't know it until I saw the pictures, though... :( I will shorten them soon. The petticoats were also made with a longer waistband than usual, but thus also have the overlap/awkward front problem. I think a partial drawstring waist may be a solution that would work, but I need to see if I can find out what was done. Possibly just resetting the waistband each time it doesn't fit well? (If you know, please post in the comments below!!!)

I also made a new narrow collar and white cuffs. Not perfect, but they work. The cuffs should be rotated more toward the back, but otherwise worked pretty well.


Most sincerely yours,
~ Sarah