Showing posts with label Technique: Sewing. Show all posts

Monday, March 25, 2019

An Angel Baby Blanket

(Topic: Stillbirth, knitting, donation)

Hi Friends!

Well, anxiety makes it hard to sleep and lack of sleep sometimes gives me migraines - not a great combo for sitting down and writing.

That said, I actually have a completed project to show you this week!

In the past I have donate blankets to the NICU, but then I found out there's a way to donate blankets to a cause closer to my heart (not that the NICU isn't a great place to donate to! Simply because of my own experience, the following cause is one I'm closer to).
I found out that my local infant loss support group, which is run out of a hospital, also supports families who are in the hospital and experience a loss.
One of the things they sometimes do is provide blankets to wrap the babies in. For this particular group, the parameters are 15"x15" (in non-gendered colors, for the tiny babies), and 18"x18" for the larger babies.

So when one of my sisters was asking for a knitting project idea, something portable and relatively quick, this seemed like the perfect thing to suggest! I provided yarn (white, acrylic) and needles and basic directions, and let her have at it.

And she turned out a wonderful blanket! I think my mom helped guide her (this sister is a beginning knitter), but the bulk of the work was my sister's.

Apparently the amount of yarn I gave her (which was from my stash!) was not quite enough to make up the full measurements. So I got asked to add a border. Luckily I had a similar yarn, in variegated neutral baby colors, to add an edging!

I started with her live edge, picked up down the side, across the bottom, and up the other side. I then added a few rows to the top, added a picot bind off, bound off one side, added a few rows and a picot bind off to the bottom, then bound off the other side.

All this worked fine, but I was having some rolling issues, so I decided to do some stitching to even things out.


Stitching the edging to the row that I picked up from. You can see the difference it makes in reducing the curl.

Here I'm stitching one of my added rows to one of the blanket rows, in effect doing an after-the-fact welt. Again, it makes a huge difference in having the edging lie flat.

From the back, you can see how I'm taking the row that was displaced by me picking up stitches, and stitching it to the edging two rows up.

The beautiful finished project! The slight widening on the ends is due to the picot edging placing a lot of stitches in a narrow space.

Credit goes mostly to my sister who created this lovely blanket, which I certain will be loved by the family it goes to! They will cherish it if they decide to keep it, and the baby will be forever snuggled if they decide to have it stay with baby.


Yours,

Sarah

To subscribe, find the "subscribe by email" note in the left column and enter your email there. Links to posts will be emailed directly to you whenever I post them! Nothing else gets emailed.

Resource list: Visit my spreadsheet at www.tinyurl.com/infantloss

Monday, March 11, 2019

Mommy and Me Apron

(Topic: Sewing, Teddy bear clothes)

Hi Friends!

Well, I had a migraine on Saturday and was busy on Sunday, so here's the post I was supposed to finish on Saturday. Oops!

This is a project I really, really enjoyed. This is the first matching outfit Pookie and I have.


This is my apron. I did not make it: I got it from Grove.co and I like it. It's not perfect, but it's nice. I had to add some extra strap to the neck to make it long enough, for instance.

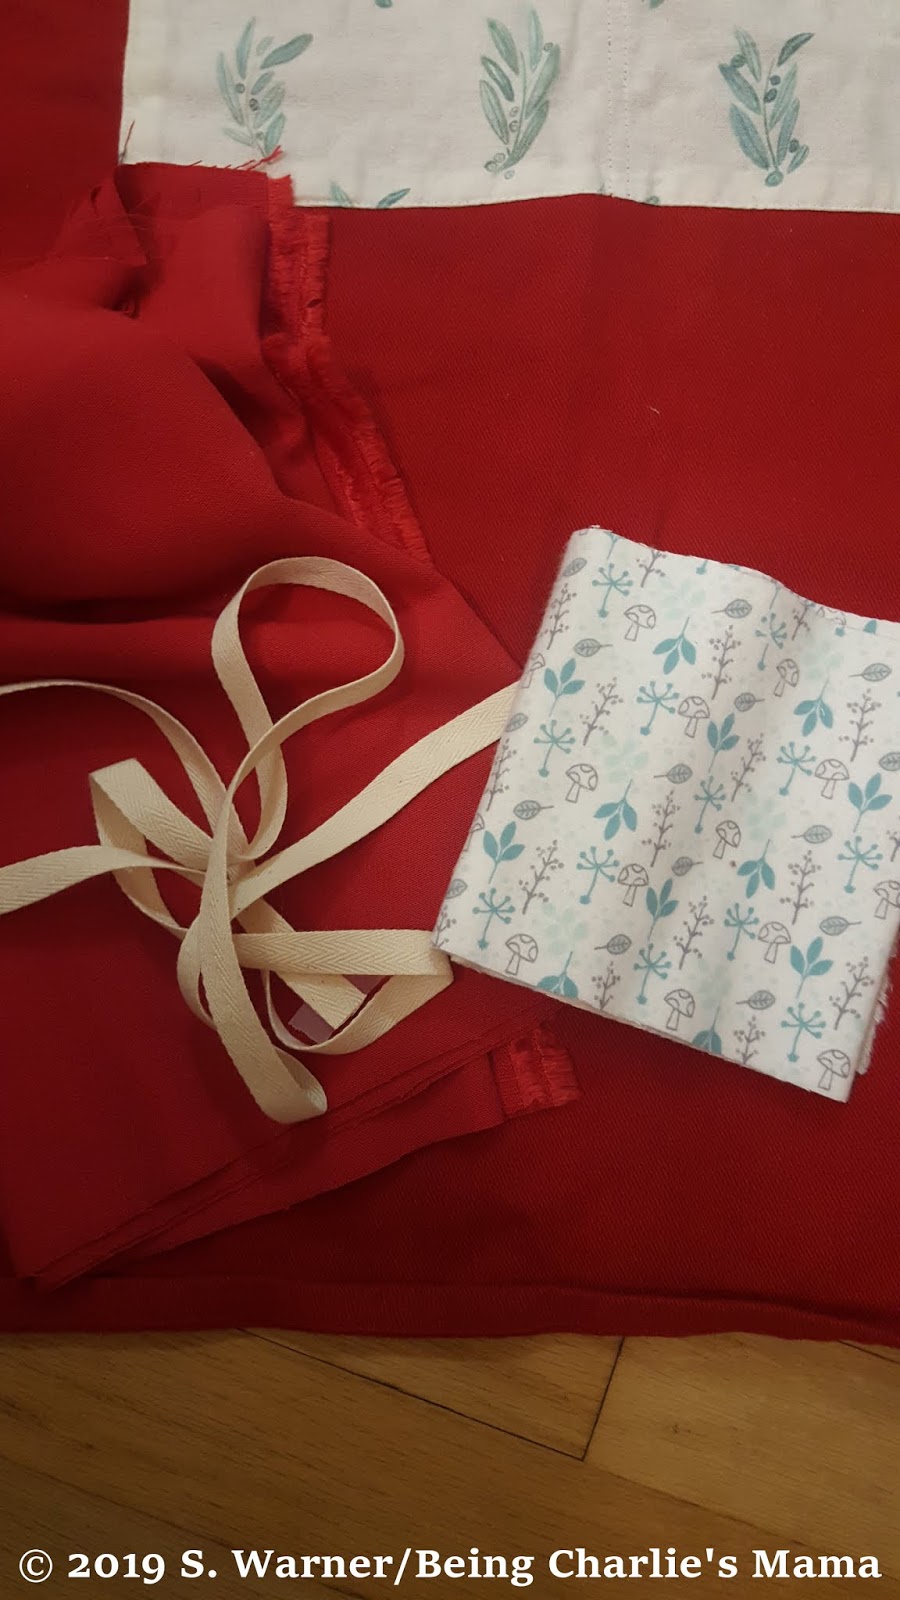
While I was at the fabric store finding cotton strap for MY apron, I found mini cotton strap!!! So I also found some red fabric that was similar enough to the canvas of my apron. The part that was tricky was finding a fabric that mimicked the pocket fabric on mine. After much hunting, I found this fabric in the flannels, which has as similar visual effect!

Laying it out after cutting out the basic shape.

Pinning the hems, and testing pocket size to get the right proportions.

All sewn, and I've added eyelets to mimic the grommets on mine.

All done! I hand stitched the straps.

Hanging with mine in the kitchen!

Pookie and Mommy handling dinner with panache!

He's helping dry the dishes afterward, too. What a helpful bear!


Yours,

Sarah

To subscribe, find the "subscribe by email" note in the left column and enter your email there. Links to posts will be emailed directly to you whenever I post them! Nothing else gets emailed.

Resource list: Visit my spreadsheet at www.tinyurl.com/infantloss
Sunday, February 17, 2019

George and Roscoe Puppets

(Topic: Sewing, crafts, puppets, shakespeare)

Hi Friends!

Some years ago now, in 2015, I saw hubby play with a puppet sea turtle, and realized that I absolutely needed to make him some puppets of his own! I'd never made puppets before, but I figured I could give it a shot. In the meantime, a friend decided that there would be a "Shakespeare Puppetry" contest at a medieval event. In fact, I'm pretty sure she came up with the idea because she also saw hubby playing with that puppet...

I went ahead with just building as my heart led me, without a particular style or play in mind. I just had fun building. I also worked at an industrial supply company at the time, and had access to materials to help me get from idea to reality.

This is George. He is made out of red fleece and fiberfill for the soft parts; his skull is half of a polypropylene ball, the interior of his mouth is a felt disc. Some parts are glued, most are hand stitched. (Note that you can see a cat puppet I already owned beside him. She has a lock washer crown on her head.)
Here you can see how his eyes fit in their sockets. In fact, this was before I put the upper lids on! The eyes are small plastic balls like the skull. The shading on his tongue and the pupils and irises of his eyes are just drawn on with sharpie, but the whites of his eyes actually glow in the dark! As I was constructing him, initially planning to have his eyes fastened on firmly, they kept slipping out of my fingers! This reminded hubby of a scene in King Lear where someone's eye gets put out. Hm....
Once we decided on King Lear, I sewed up some decently Shakespearean clothing for him. We cut down the scene and eliminated a few characters to make it doable for 2 people (3 puppets total). George played The Duke of Glouchester - whose eye gets put out by sword, I believe (though it was a bit more haphazard than that in our version!). The cat (named Mies) played one of King Lear's daughters. We added the conceit that she meowed like Henrietta Pussycat from Mr. Rogers.
This crotchety old fellow is named Roscoe. He played Albany, who did the dirty deed. Thus, Roscoe's eyes needed to stay in place! Between bigger lids and a lot of glue, his eyes stay firmly in his head. They are made the same way as George's but don't glow. His hair is actual wool, and he's bald on top! He also has a dowel from his head downwards, which is used as a grip by reaching in through his back.

Full cast photo :)
P.S. I did make legs for Roscoe. However, I ran out of time to attach them before the puppetry contest, so his legs still lie in the box with them, separately!

 We ended up putting on the funniest tragedy! Our comedy of errors - since George's eye fell out early! - had our audience rolling. Best of all, I had a blast putting this crew together!


Yours,

Sarah

To subscribe, find the "subscribe by email" note in the left column and enter your email there. Links to posts will be emailed directly to you whenever I post them! Nothing else gets emailed.

Resource list: Visit my spreadsheet at www.tinyurl.com/infantloss

Saturday, October 6, 2018

Music Stand Case

 (Topic: Sewing)

Intro

Friends, although this is Pregnancy and Infant Loss Awareness Month, and this is a blog that is largely about life after a loss, this is also where I post about my hobbies - but only on Saturdays! So even for this month, I'll be sticking to my usual format of grief/loss content on Wednesdays and sewing/knitting/etc on Saturdays.

Below are pictures of a project I completed last year. Enjoy!


The Music Stand Case project

I am on of many siblings in a very musical family. I suppose it was inevitable that I would someday be asked to make something related to that!!! As it turns out, I was asked to make a case for the music stand my violin-sister uses. She'd had a bag for it, but it wore out and the folded music stand would poke out. It got to the point where it could even fall out, so I got to make the replacement.

It needed to be sturdy, so I dug through my stash for some durable fabrics, and came up with several pieces of canvas that would hold up to use. I had different weights and colors and types, including a boring beige which was rejected! I ended up using a nice sky blue.

Instead of just seaming, I used a binding like her original bag had had. But not boring black! I found a woven band (again, in my deep and varied stash!). I was even able to find one that coordinated with the colors. And I used some scrap fabric to make a handle.

Back of bag, closed. The woven trim has a blue background, with a repeating floral and some metallic. Handle purposely has slack to be grab-able even when the bag is full.

Back side, open. The piece of trim is to cover and decorate the stitching for the velcro closure.

Front/top open. Trim also protects the edge of the opening.

Front top, closed.

As far as I know, this bag is still in active use! It was a fun project, especially since I knew it was practical but would also be enjoyed, and would be distinctive in an orchestra room with all the black bags and cases!


Yours,

Sarah

To subscribe, find the "subscribe by email" note in the left column and enter your email there. Posts will be emailed directly to you whenever I post them!

Resource list: Visit my spreadsheet at www.tinyurl.com/infantloss

Saturday, July 21, 2018

Beautiful Chapel Decorations

(Topic: Religious symbols, fabric crafting, design)


Dear Friends,

Remember a few months ago, I did a series of posts about a set of three banners, including a follow-up post? In the follow-up, I had pictures of some banners that inspired me. I don't remember if I said, but they were in the Valparaiso University Chapel. They have a stunning space, and choose their vestments and decorations to match and support the space.

I recently had the chance to go there again, and they had some amazing decorations up on their staggered brick walls, which you can see the long view of, above in the top picture of this post. They were borrowed from another church, I was told, and made of felt - and, I believe, simply stuck to the wall like a feltboard!

Each decoration was a huge circle - maybe 20 feet across? That's totally a guess based on looking up at them. And each had different types of religious symbology, in some cases similar to the symbology I used in the banners I made, but fascinatingly these were all symetrically mandala-like. I took pictures of several, because their use of color and design was amazing. Please enjoy!

This was in a Lutheran chapel, and the symbol in the center here is the Luther Rose. This one has a Lutheran theme.

Easter theme.

Again, an Easter theme.

A Pentecost theme, which was when I was there.
See what I mean about a lovely use of form and color? I found them to be absolutely stunning.


Yours,

Sarah

To subscribe, find the "subscribe by email" note in the left column and enter your email there. Posts will be emailed directly to you whenever I post them!

Resource list: Visit my spreadsheet at www.tinyurl.com/infantloss

Saturday, June 30, 2018

Table Runners

(Topic: Sewing)


Hi Friends!

This has actually been (and still is) an ongoing project: a friend has a sideboard top that she needs table runners for, but because it has a ledge, the table runners need to fit within the edges.

She also wants them for nearly every holiday and season :)

So I have the dimensions she needs, and create a rectangle with wide hems that will fit.


Some of them I do with a full length piece of fabric, but that means that I'm not using nearly all the width, so it is more efficient (and affordable) to make the runners with a center seam halfway along the length, which means I can use half the length and just use two pieces of the width.

After that is just a matter of making sure that the corners are properly square and the dimensions match!


Yours,

Sarah

To subscribe, find the "subscribe by email" note in the left column and enter your email there. Posts will be emailed directly to you whenever I post them!

Resource list: Visit my spreadsheet at www.tinyurl.com/infantloss

Saturday, May 26, 2018

A Little Bit of Embroidery

(topic: embroidery, designs)


Dear friends,

Recently I got my mother a dishtowel as a gift, but when she unpacked it, realized it was twice the size she usually uses! Easy to fix: most of the towel was blank, so I just cut it in half, and hemmed the edges. Voilá: the part with the design is now on a towel of the right size, and now I'm in possession of a blank tea towel! It took very little time for me to realize that the blank towel was, in fact, a blank... well... not technically a canvas! I decided to make a matching design.

Here's the original design, printed on the towel:


Step one: trace the design from the original towel to the blank one, using a light box. Here's the traced design, in blue fabric chalk, with the beginnings of my backstitch outline.


And here it is, with more done (bad lighting, sorry):


Now we're getting close! I've done all the outlines, all of the stitches in both the shades of yellow I chose - this includes the stripes of the bee (satin stitch). Also, I've now done both shades of green, plus the blue/gray buds, which are worked in french knots.


And, done! I'm really happy with this:


The back of the work is pretty tidy, and yes, I do knot my thread, and here's why: If I were going to frame and display this, or use it in something where the back is hidden, I would want a smooth finish, so I would take time to hide longer tails, and depend on friction to keep them from working loose. But for a tea towel, which will be used for drying dishes, and which will go through the laundry, I need to make sure that the threads are firmly anchored and will not come loose with a tug. So, knots. They are small, and fairly buried, and like I said, I keep the back neat so that it looks ok since it's not hidden. I'm really pleased with how it came out, and especially since it's been several years since I've done embroidery.


Yours,

Sarah

To subscribe, find the "subscribe by email" note in the left column and enter your email there. Posts will be emailed directly to you whenever I post them!

Resource list: Visit my spreadsheet at www.tinyurl.com/infantloss

Saturday, April 21, 2018

Church Banner Triptych Set


Hi Friends!

Now that you've seen the 3 banners for church develop individually, I'd like to explain a little more about the inspirations, and also tell you some of the hidden secrets!


A stained glass window at church, with some of the symbols of Rocco: Hat, dog, staff.
One of the inspirations was too look at some of the symbology already present in the church, and the histories of the saints themselves.

The St. James window, with the scallop and sword.
Another resource was looking at banners I could take inspiration from. I traveled to Valparaiso around the time I started the project, and initially, this banner caught my eye, for some techniques (not design).

This banner has lots of texture. Couched threads, textured fabrics, smooth fabrics, and metallic threads all play a role.

I particularly liked the couching (where you lay a thick thread on top of the fabric, then use thin threads to sew it down). There are a few pieces that are currently glued and will be couched on the St. James banner, but I abandoned the technique as not giving the effect I wanted, based on the types of fabrics I was using.

However, as I was shown the University Chapel at Valparaiso, there was one banner set that really started catching my eye. Not only were they neat on their own, they gave me clues about how to make several banners look like they belonged together.


By looking at this banner set, I learned that you could use several motifs (light, ribbons, and a scene) and by having them cross over multiple banners, and using a piecing technique to bring in multiple colors, you could still get a set.

I hope you can see that happening here too:


The following info is what I shared with the congregation about some of the hidden features and details of the set.


The Saint Banners: Did You Notice?


St. James

- The red cross actually contains some of his other symbols: the bottom is the pointed sword, and the top and sides represent his scallop(s)
- The red shield is in homage to the St. James Church coat of arms, which is a red shield with three scallops and a sword


St. Andrew

- Some of the blue fabrics have a nautical theme. Bonus if you notice what’s on the period on the word “St.”!
- The overall color is blue because that reinforces the nautical/fisherman theme
- The fish actually has scales, if you look closely. They are made of glitter on a see-through fabric, but the glitter is trapped because I used the fabric upside-down!
- The fish also has an eye
- The net has three ropes, representing the Trinity
- Can you see the St. Andrew’s cross? It isn’t actually made of fabric, but the negative image of the cross is formed by the blue squares, outlining the white saltire


St. Rocco

- This dog is copied directly from a medieval drawing, since St. Rocco lived in the middle ages, including the style of his eye and his collar
- There is a cross on the loaf of bread


All Three: Similarities


- The overall style is similar: the use of bold color and blocks/squares for much of the design
- All are abstract to some degree
- All have an animal
- None have humans
- Each has at least one human tool
- All use a silver fabric (sword for James, fish for Andrew, dog for Rocco)
- All are the same size and use the same background/base fabric
- All three have some form of cross


All Three: Differences

- None share any colored fabrics
- Each has a different featured color (Reds for James, Blue for Andrew, and Green for Rocco)
- Each has a different featured shape (triangle for James, diamond/X for Andrew, and upside-down V/square for Rocco)


Yours,

Sarah

To subscribe, find the "subscribe by email" note in the left column and enter your email there.
Posts will be emailed directly to you whenever I post them!


Resource list: Visit my spreadsheet at www.tinyurl.com/infantloss

Saturday, April 14, 2018

Church Banner - St. Andrew

Sketch for St. Andrew banner
Hi Friends,

This banner was fun but oh, so much harder to put onto fabric what I had in my head!!! As you can see in the sketch above, St. Andrew (a fisherman) is being represented in a nautical way, with a large fish in the center.

To begin with, I started with the fish. The squares, while a multitude, are geometrically simple, so those came second. The net... ah, the net. We'll get to that.

The fish.

To make the fish, I used the same technique as with the dog: iron-on the interfacing, draw the fish on the paper in reverse, then cut it out.


Fish compared to banner. Note that due to aspect ratios, I had to shift proportions when transferring the idea to fabric.


The squares in place, but not ironed down. Selecting the fish angle: nose down...
...or nose up? The lines are masking tape, helping me keep some angles lined up.

Still hadn't figured out the net, and can't place the fish till the net was done, so I set that aside, and worked on the squares and the name. The squares needed to not have too many of the same print near each other, and I wanted the slight fade-out effect from using different sizes.

Working on the name.

Squares are ironed down. Now placing, aligning, and ironing down the name.

At this point I hit a mental roadblock. Initially, I had thought of creating some sort of string net in dark grey, and couching it to the banner. But the amount of handwork was daunting (not in and of itself an issue), and I hadn't figured out how to not have the ropes show through the fish and give it a weird texture.

I looked at various types of netting, lace, and other hole-y fabrics, in hopes I could find something flatter that would give me the look I wanted. I found nothing that worked. The project came to a standstill. Luckily, I still had some time.

I kept browsing for options and frequently went to fabric stores to try to figure out a way past the incongruities between my vision and what I could put my hands on.

Finally. I realized that maybe I could find a fabric that just looked right. It had to be dark lines on a light background, though, and most prints with ropes are dark blue with white or tan ropes, so this would take some hunting. Eventually, though, I found what I wanted!!!


The diamond "weave" matches the lozenge blank space on the banner, so that is a lovely shape-echo


Here you can see the color a bit better. It's a pale blue with very dark navy lines.

So now I have a net! Still a bit of shaping to be done, but it means I can go back to the fish for a bit.
The fish originally was going to have individual scales, each of a different color. I swapped that plan in favor of a sheer teal tulle, which was much more synthetic than I'm used to working with. Had to turn my iron cooler! And... this part I paid for... it had a glitter pattern shaped like fish or mermaid scales. I reversed the fabric, so the glitter side faced the silver fish, but once it was ironed down, you could still see the scales (without the banner shedding glitter).

... I got a little over zealous cleaning up the glitter (which I am not a fan of!) and accidentally touched my hot iron... had blisters for a week... oops!


The scales and the fin stripes are from tulle fabric and tulle ribbon respectively, in both cases with the glitter encased.

After a bit of playing with it, I managed to shape a net, and started working on positioning:


And here we go! All put together!


Staying ironed on the rocking chair waiting to be delivered to church!


And hanging up!

The symbolism:

The Saltire
You may be familiar with the flag of Scotland, which is blue with a white X (also called a saltire). This is the Cross of St. Andrew, which originates from the shape of a sideways crucifix or similar cross, which is how St. Andrew was killed.

The Net
St. Andrew was a fisherman, and one of Jesus’ disciples.

The Fish
Again, St. Andrew was a fisherman, and he "fished for men" according to the story.

Other names for Saint Andrew include: None! He was only St. Andrew!


Yours,

Sarah

To subscribe, find the "subscribe by email" note in the left column and enter your email there. Posts will be emailed directly to you whenever I post them!

Resource list: Visit my spreadsheet at www.tinyurl.com/infantloss