Showing posts with label Material: Muslin. Show all posts

Wednesday, February 28, 2018

Pocket and Bustles


Hi Friends!!!

As you may have seen or heard, I recently went to a ball, so there will be several posts related to that coming up.

As I was preparing for the ball, I realized that since a friend was making my ball gown (Sarah Crow, The Preacher Wife's Gowns and Carr Antiquities (Facebook)), it was my job to make sure I had all the under layers and "shape wear" I needed!

My primary project was a chemise, which functions like an undershirt, basically, and has enough sleeve to keep your underarm from affecting the pretty dress, and gives you a layer against your skin before you put on other things. I didn't get any in progress pictures on that one except for the picture of pleats at the top of the post! To me, pleats are the simplest and quickest version of gathering a wide amount of fabric into a small space. Some people prefer gauging/cartridge pleating, or prefer gathering. Here's the thing, though: as long as the pleats don't have to be perfect-perfect, and can be large, I find I can spend much less time handling the fabric.
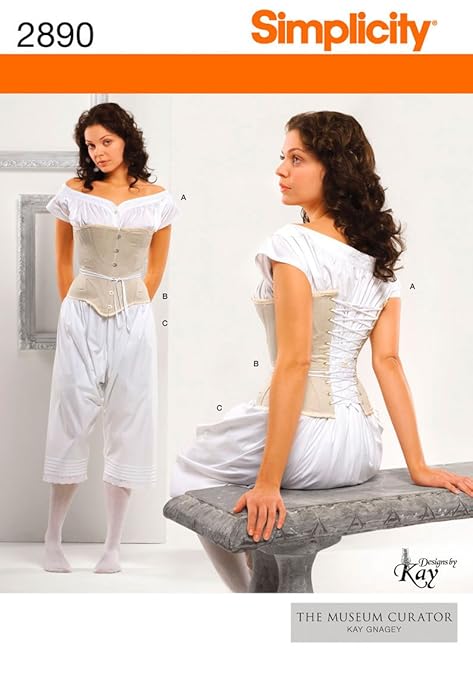
https://www.amazon.com/Simplicity-Curator-Pattern-2890-16-18-20-22-24/dp/B004NBXQNA
The lady on the right is wearing a chemise; the lady on the left has a chemise, drawers over that, and then her corset.

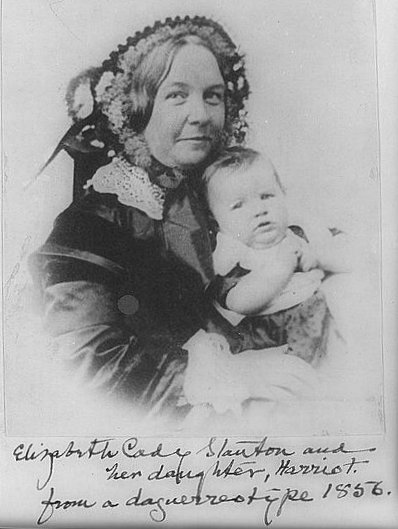
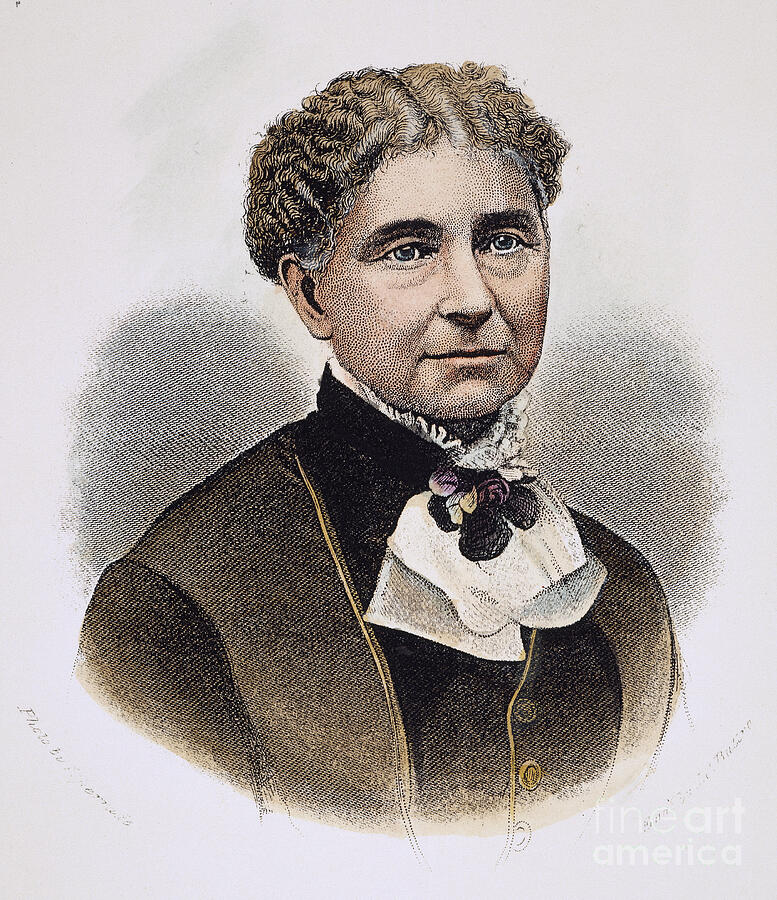
I also threw together some drawers, which are sometimes referred to as "bloomers" by non-costumers. Here's the difference: drawers are "undies", generally were not sewn along the crotch so they didn't make you do as many gymnastics while in a hoop dress (and were a kind of automatic seat liner...!), and would not show at all, since they often came to just below the knee. Bloomers, however, nicknamed after Amelia Bloomer (but actually more widely worn and championed by Elizabeth Cady Stanton), were outerwear. They were a form of early pants for women, but still involved a lot of fabric for decency, and were only used in certain situations (such as bicycling and sports) or by certain women (clothing reformers, primarily. And please don't call either drawers or Bloomers "pantaloons"! I believe that is a later term, and, in any case, is often referring to something seen peeking out below skirts in vaguely historic-esque westerns filmed in the 1960s...
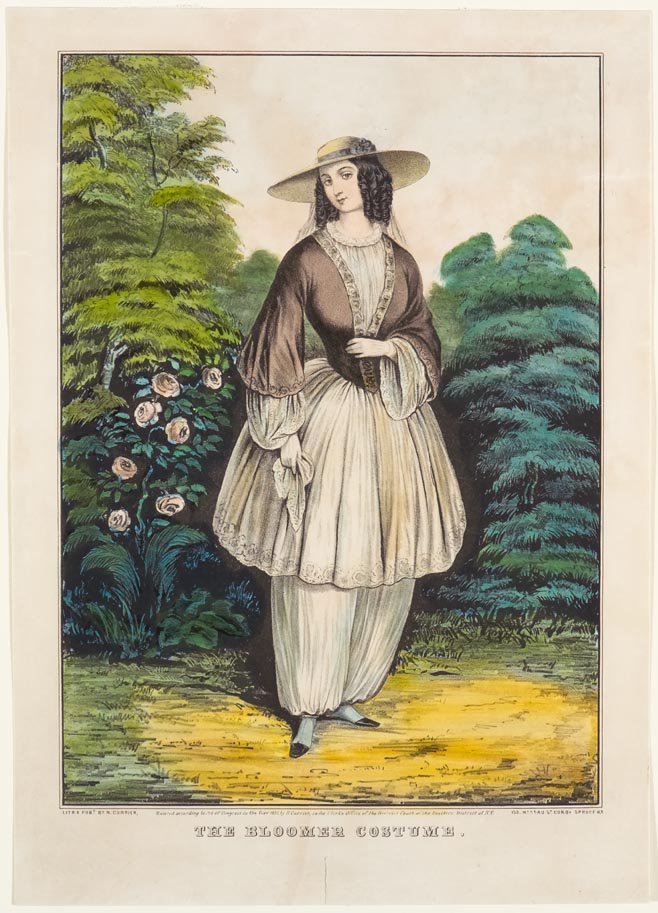
https://springfieldmuseums.org/wp-content/uploads/2015/10/the-bloomer-costume-by-nathaniel-currier.jpg

http://images.fineartamerica.com/images-medium-large/3-amelia-bloomer-1818-1894-granger.jpg
Amelia Bloomer

https://upload.wikimedia.org/wikipedia/commons/4/48/ElizabethCadyStanton.jpg
Elizabeth Cady Stanton
Then once the essentials were taken care of, it was time to work on some invisible accessories. By invisible I simply mean that when fully attired for the ball, you might be able to guess these were there, but you'd never see them. When wearing hoops, they ought to balance around your body a bit like a bell, and a person's body shape affects how they hang and how well they provide what is called "back thrust" (a bit more hoop behind than in front), which became more and more desired as the 1860s progressed (and eventually developed into the bustle of the 1880s and 1890s).

However, I have a more prominent belly and less going on behind, so my hoops tend to sway forward rather than back. Luckily, I'm not the first person in the last 150 years to have this problem! As a solution, placing a well-stuffed pad where there isn't any natural padding will help the bulk of the skirts stay in the back.
Based on Elizabeth Stewart Clark's pattern in The Dressmaker's Guide, I came up with these: the left shape is what the pattern gave me, the right shape was me thinking that the first one couldn't possibly be big enough and must be too wide... Guess who was right? (hint... not me...). The one on the left works beautifully, and gives my skirts a lovely shape. I haven't used the one on the right, but I'll keep it for now and see if I find a use for it.
They are made with cotton, cut as 2 crescents, sewn together with wrong sides facing (leave a gap), add the waistband, THEN stuff (if you are using a machine. If by hand, stuffing first gives the advantage of being able to toy with size, fluff level, and placement, but if you try to add the waistband next by machine, you'll be cursing the day you were born because there just isn't enough room for the foot to get to where you want the seam. I may have figured this out the hard way.). The waistbands close with buttons.


One of my sisters asked why I was using such a fancy fabric. The answer is twofold: I had it on hand with no plans for it, and it's pretty! It is not a reproduction fabric, and in fact is not even one I bought with this era in mind. It is, however, close-ish, AND, more importantly, not visible from the outside! I try not to make non-period concessions like this, but... SO PRETTY!!!

The second thing I made with the ball in mind is a pocket, which gets tied (or buttoned) around the waist beneath the skirt. Some skirts had pockets sewn in, but some didn't. However, most had a closure or a slit placed in such a way that you could reach through and into this style of pocket. I had one before, but it wasn't pretty (!) and was so shallow I was worried I'd constantly loose things. This one is almost too deep! I love it though!

It is made with cotton. The front is 2 pieces that add up to wider than the back, so I could make a seam down the center with a slit in the upper portion as the access. The waistband (which could be narrower) is long so I can tie it on, but you could do buttons if you wanted to.


See you soon with 2 posts about new dresses! Lots of posts in the works, guys!

Yours,

Sarah

To subscribe, find the "subscribe by email" note in the left column and enter your email there. Posts will be emailed directly to you whenever I post them!

Resource list: Visit my spreadsheet at www.tinyurl.com/infantloss

Saturday, September 6, 2014

Another Slat Bonnet

Hi ladies and gents!

This time I'm making a historical bonnet for a friend of mine, who wanted appropriate headwear for when she visits me at reenactment events. Okey-doke!

Oh, and by the way, 50th post. Not much I know, but a small landmark :) A thank you to all the loyal readers I just lately discovered I actually have!! You guys are great! :)

Now back to your regularly scheduled programming:

Garment Data:
- Type: Civil War style Slat Bonnet
- Date made: July/August 2014
- Pattern: Based on the bonnet from The Sewing Academy
- Fabric/Materials: A pink reproduction cotton print, with a nice crisp hand
- Trim: none
- Time to finish: oh, a few hours, I think, or so.
 
The front of the bonnet is at the bottom of the picture. In this picture, the bonnet is completely unfolded. The crescent is long enough to cover the back of the neck, and the front has a width that means it will shade your cheeks but not go too far down over your shoulders that it gets in the way. the front portion/brim is lined with muslin, and the slats only go down to about the ears. You can see the under-chin ties.

  
Here it is, folded along the top edge, so you can kind of see how it comes together. The left side is the brim, and the right side goes down  the back.
 
Now it's tied, so you can see how it's shaped! This is a view into the inside of the bonnet. The under-chin strings are visible - the outside strings on the back of the bonnet are what's holding it in this shape.

And the completed beauty! On the right you can see how the outside ties form the puff for over the hair, gather the bonnet at the neck, and allow the rest to shade the neck and upper back.

Most sincerely yours,
~ Sarah

Wednesday, March 5, 2014

Red Memorial Day Daydress

Dear Ladies and Gents,
you may have noticed an item of wear recurring in mention multiple times: a basic red cotton daydress, which, when worn without hoops, can serve well enough as a camp or work dress.

Garment Data:
- Type: Civil War style daydress
- Date made: Just before Memorial Day, 2013
- Pattern: Simplicity 4551, plus alterations. I actually ignored the gathered front, and just used the lining pattern for both the in and out, and thus made a darted bodice.
- Fabric/Materials: A red cotton calico print, just over 6 yards, 42" wide
- Trim: None
- Time to finish: About a week


The fabric I selected was a red cotton print from JoAnn's, with flowers on it. I had the yardage originally for a "prairie" dress, but decided to put it to use for the civil war era.

Note that the flowers are not in a regular pattern, unfortunately.
They are white with a dark (black?) center. This color combination meant that I could wear "Red, White, and Blue" for the Memorial Day church choir concert, civil war-themed, that I was going to be dressing for.
I found out later that the fabric is fairly thin, and not exactly colorfast.

Bodice front, with front darts pinned in. This is from the lining side. The lining is just a plain muslin.

And the same front piece from the outside.

The assembled bodice, from within. Note that the lining and outer layer are sewn as one.

The completed bodice, with the bodice band at the bottom. I later realized that the bodice was too long, based on where my waistline was, so I ended up putting a 1-inch tuck to the inside, about an inch above the bodice waistband.

Here with the sleeves pinned on.

And here with them sewn on! The bodice was, at this point, done aside from closures.
Unfortunately, I noted some fit issues when I put it on:

Whoops! Turns out this was a combination of problems: 1) the pattern size is not necessarily indicative of actual size. 2) measurements on the back of the pattern are more important than the size number. 3) the measurement on the package is not necessarily the same as the measurement of the final piece.
Note also that the neckline was too tight and was pushing on my neck. Also, the sleeve seams were dropped too much with respect to my shoulder line. And the sleeves were too wide on the lower arm.

A sleeve before it was attached. The blue underneath becomes my "kickplate" or hem lining/facing for the skirt. This is a piece of fabric on the inside, where you can't see it, that makes the skirt hang more steadily and absorbs the brunt of my toes kicking the skirt. This means that the skirt itself takes less wear and will last longer.

This fabric was actually another skirt, that had been worn out and stained. I love the regular pattern and wish I could have a dress just of this fabric!

And a close-up, for droolworthiness. It is definitely a cotton, of better quality than the rest of the dress!

Here you can see the lining attached around the bottom of the skirt, to protect the hemline.
I attached it while the skirt was still a flat rectangle.

The waistline, with gathering stitches. Upon consideration and later experience, these stitches should have been smaller and closer together. What I'm aiming to do is create a "gauged" waistline, so the fabric at the top of the skirt is folded over (ideally somewhat more than I've done here, but I was a bit tight on yardage), and then basted with gathering threads in very regular, even stitches. The stitches are about 1 cm long (between 1/3 and 1/2 inch), and are made with two rows of double-stranded 100% cotton thread that has been waxed with beeswax.

What I've done here is pinned the waistband in a few places to make sure the center and sides match up, and then tightened the gathering threads some. You can see the "skirtiness" starting to take shape.

The wide view, so you can see how it's starting to shape up.

Gauging, from the outside, after the bodice has been whipped onto the waistband.
Note that the gathering has formed perfect ripples of fabric.
You can see that the bodice comes down all the way to the gauging, and that the bodice waistband covers the separate skirt waistband. If you look really closely, you can even see the small whip-stitches holding the "pleats" of the gauging, and the small tacking stitches in the waistband, holding the skirt to the bodice!

...Aaaand from the inside. Note that those perfect ripples of fabric kind of just hang there. The bottom edge of the waistband is whip-stitched to the "valley" of every "pleat". The things that look like horizontal puckers in the waistband are actually a slightly darker red large thread stitch, holding the bodice waistband (not visible) to the skirt waistband.This doesn't sound solid, but I promise, it is. Also, if you use short pieces of thread, and use a lot of them to go around the skirt, then if one section breaks, you don't have your whole skirt falling off, and it's easier to fix.
Note: You can see daylight between the pleats, which means that each gather was too wide and the pleats are too big. If I had made the gathering stitches smaller, then the pleats would be more numerous and closer together. I ended up flattening them all to one side and whipping them down to eliminate the gappage, though if I were to redo the dress, I would repleat with smallter gathers.

 
This is the assembled garment! It still needs closures, though.

I still had some fit issues, as you can tell by these pictures of the back. Again, this had to do with the bodice being too long.

The neckline creeping up the back of my neck, as you can see here, was eventually solved by cutting out a crescent from the back and refinishing the edge.

The necktie. I borrowed the way of tying it from another reenactor - who got the method from Godey's Lady's Book.
Though I have heard that cutting the necktie on the bias means it will lie flatter, I cut this one on the straight - perpendicular to the grain. This had to do with fabric restrictions (and it is also due to the time restriction - I didn't have the time to piece a bias tie from smaller sections).


Here's a picture of the tie close up.

From the side you can really see how the back of the neck was pushing forward. The tie is basted on, but will eventually need a white collar to be under.

The front, pinned shut. It took me half a year to get around to adding buttons. You can see how it pulls: the fit issue of being too tight was later accidentally resolved by me changing shape.

The finished product! The best full-length picture I could do on my own.

And on Memorial Day! The dress was a hit.

It has become a staple of my wardrobe. Here you see it in Gettysburg, June of 2013.

Here I am at Sunbeau Valley, the local horse farm, for their annual reenactment. I'm also wearing my slat bonnet and blue belt.

Same event. You can already see fading along the bottom hem, where I scrubbed out Gettysburg mud. At this point I was still pinning it shut.

And at LINK: Hale farm in August. Different neckwear! And you can see that I'm still pinning it shut.

November, and in LINK: Gettysburg again. By this time, I've added buttons, but am here wearing it with a Sontag (Bosom Friend) for warmth, so they don't show! Later in the day I added a wool cloak, and was actually wearing a sweater beneath, as well: it was quite cold, and very windy!

Here you can see the buttons and the collar. The collar is borrowed: collar and cuffs are on my list of "to do"s! The buttons are shell. This picture was taken at the LINK: ORMB this year.

And last, but not least, a picture from June/Gettysburg, of the red dress as seen in a tintype. Credit to Szabo for the picture! (And I'm realizing I never posted about the June 2013 150th Gettysburg trip! Well, that may be coming up, we'll see.)

Most sincerely yours,
~ Sarah

Sunday, July 28, 2013

Tucked petticoat

Posting some older items, to catch up with what I'm working on now!

Garment Data:
- Type: Petticoat
- Date made: February 2, 2013
- Pattern: Self drafted
- Fabric: Cotton - a basic muslin, white
- Trim: none (but with 3 tucks)
- Time to finish: don't know
- Notes: meant for closest to the body - beneath the hoops. Three 1+1/2 inch tucks 1 inch apart with a 2+1/2 inch hem. Gathered onto a waistband.


Most sincerely yours,
~ Sarah